Disassembly of the Fujitsu LifeBook T4200 Series Tablet PC
July 15, 2008 59 Comments
This guide is a mirror (mostly) of the one posted over at the Tablet PC Review.com forums.
This disassembly guide is a primer on how to disassemble the Fujitsu LifeBook T4200 Series Tablet PC to get to the Socket P socketed processor so one can upgrade from a “Merom” 65nm processor to a “Penryn” 45nm processor, reapply thermal grease, clean out the heatsink and fan, and so forth. This guide will not go in to specific details on how to a.) replace the processor and ensure stable operation; b.) remove and reapply the thermal grease; or c.) clean the heatsink — it is simply a basis to get access to the processor, what you do from there is up to you. This guide is applicable to the Fujitsu LifeBook T4210, T4215, and the T4220 as these models all use the same chassis, but may be also applicable to previous and possibly future generations of the Fujitsu LifeBook T4000 series line. And, now for some friendly reminders:
Notices and Warnings
Notice: This will void your manufacturer warranty, make sure you are willing to accept that any mishaps during disassembly of your system will void it.
Warning: This guide is also not for the faint of heart, in any disassembly there is a risk that you may damage system components. It is your responsibility and ultimately your choice to proceed with the following guide and its steps. I must admit that I had a couple of close calls of possibly damaging something, it’s a risk that one must take, even when documenting a disassembly guide.
Warning: Electrostatic discharge (ESD) kills sensitive components like the one found in your Tablet PC or any other system. Remember to ground yourself before touching any component or wear an antistatic wrist wrap at all times when dealing with computer components.
Warning: You can not undo any of your actions when disassembling if any system component is damaged. Like the first warning, make sure you are willing to risk disassembling your system because opening up your system will void your warranty. If only life was as easy as doing a Ctrl-Z. 🙂
Right, now that we’ve gotten through that, let the disassembly begin!
What you’ll need
- An antistatic wrap or an object so you can ground yourself from static electricity
- 50mm or 75mm Phillips Screwdriver
- 50mm or 75mm Flathead Screwdriver (or something thin and flat)
- Jumper Tweezers (optional, but helps getting screws out of tight spaces)
- Paper (optional)
- Pen or Pencil (optional)
Planning
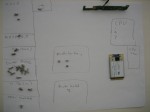
I recommend that you have a pen or pencil and paper ready because its easy to loose track of which screws goes into which. As you see in the image below, I’m taking no chances with ending up with a few screws that belong somewhere in my Tablet PC. I’ve dissembled quite a few notebooks, and always ended up with one to three extra screws. You don’t have to do this, but it doesn’t hurt to know which screw goes where.

Disassembly
Caution: Take it easy when removing the screws, you’re trying not to strip the screw. If the screw driver slips while your loosening the screw, reposition it and slowly turn it to loosen the screw. It may feel like it’ll take an eternity to remove a screw out of many screws, but for screws this small, it’s better to take it easy than stripping it.
- Remove the weight saver, battery, or optical drive from the modular bay.
- Remove the main battery.
- This step is optional, but remove all memory modules from the memory compartment and place them aside, preferably far away from where you are dissembling your system.
Step 3 - Remove memory module(s) if needed
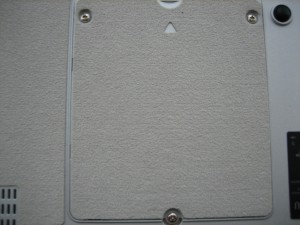
- Remove the two screws from the hard drive compartment door.

Step 4 - Remove screws from hard drive compartment door
- Remove the hard drive compartment door and pull the HDD ribbon connector upwards.

Step 5 - The HDD data ribbon cable

Step 5 - The HDD ribbon cable removed
- Pull the hard drive up by pulling the black tab then remove the hard drive.

Step 6 - Pull on the HDD tab on the side and slide out HDD
- Remove three screws (with arrow icon) near the hinge.

Step 7 - Removing the three screws near the hinge
- Next, remove the two screws behind the hinge.

Step 8 - Remove two screws behind the hinge
- Now, to remove the keyboard: following kureshii’s excellent guide (and since I didn’t take pictures of this process because it requires both hands) to remove the keyboard plate and the keyboard itself.
- The long strip, which kureshii calls the “keyboard lock” (and I’ll refer to it as the “keyboard plate” for consistency), below the display and above the keyboard is what we’re going to remove first. Gently pry with a flathead screwdriver (or something thin and flat) both the left and right side of the plate (marked accordingly) and slide toward the middle of the plate. It’ll help to press down a couple of the top row keys so the center screw shaft is free. Once the middle of the keyboard plate is free, remove it and move on to the next step.

Step 9.1 - The tricky keyboard lock/plate
Photo used by permission from kureshii.
- You are now free to slide out the back plate.

Step 9.2 - Slide out the back plate
- Slowly pull the keyboard away from you until the lower tabs of the keyboard near you are free from the chassis. Slowly rise the entire keyboard upwards about half an inch, and detach the keyboard data ribbon. Don’t yank at it, but just enough so that it is detached.
- The long strip, which kureshii calls the “keyboard lock” (and I’ll refer to it as the “keyboard plate” for consistency), below the display and above the keyboard is what we’re going to remove first. Gently pry with a flathead screwdriver (or something thin and flat) both the left and right side of the plate (marked accordingly) and slide toward the middle of the plate. It’ll help to press down a couple of the top row keys so the center screw shaft is free. Once the middle of the keyboard plate is free, remove it and move on to the next step.
- Now, on to the bottom of the Tablet PC, there are 15 total screws to remove as outlined in the picture below.
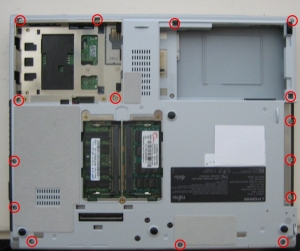
Stop 10 - Remove 15 screws as outlined
- As outlined above, don’t forget about the three screws in the modular bay.

Step 10.1 - Remove the three screws in modular bay
- OK, I lied when I said there were 15 screws to remove, actually there are 16 total for this step (not including the three you already removed in step 7). Look in the battery compartment bay and find the screw next to the label “M2TPx5.5” and remove it.
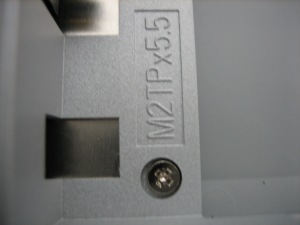
Step 10.2 - Remove the screw in the battery compartment
- As outlined above, don’t forget about the three screws in the modular bay.
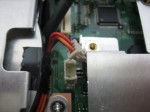
- Great, now carefully flip the Tablet PC over and open the display. In the area where you would normally see the rotation arrow indicators, you’ll see that there’s a circuit board held in by a screw. Remove that screw, then gently pull it upwards and remove the RIGHT wire connector FROM it, and remove the LEFT wire connector FROM the MOTHERBOARD. This will make it easier to know which one connector goes into which when it comes to reassembling the Tablet PC.
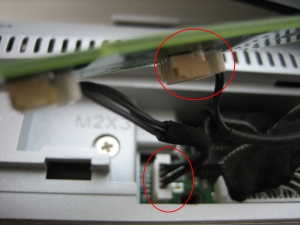
Step 11 - Remove screw, pull rotation indicator board up, remove right wire from circuit board, remove left wire from motherboard.
- In the same area where you removed the rotation indicator board, you’ll need to remove the LCD display cable (white) and the Wacom serial cable (black).

Step 12 - Remove the two display cables
- Now to remove the touchpad data ribbon cable, located near the touchpad, by pulling the green connector with a finger upwards. When it is as depicted in the picture, you can easily slide the ribbon out.

Step 13 - Remove touchpad data ribbon cable
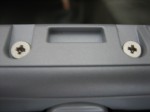
- Now, remove the three screws labeled “M2X3”.
- As shown below, slowly peel both of the black tapes just enough so the wireless antenna and temperature probe wires can freely move. Carefully pull out the two antenna wires on the wireless card (blue circles). You don’t have to eject the wireless card from its slot, but if you have to press both of the tabs (red squares) to the left, and then gently lift the wireless card up and out of the slot. If you’ve installed laptop memory before, this process is the same. For reference: the black wireless antenna wire goes on top, the grayish one on the bottom.

Step 15 - Peel back tape, remove wireless antenna wires, optional step of removing wireless card
- Next, to the right of the heat vent fan, remove the wire from the motherboard. When reassembling, be sure to reattach this cable or else your system will overheat quickly!

Step 16 - Remove the fan cable from the motherboard
- Now, we remove three more screws. One screw is near the wire you just removed in the previous step, the remaining two screws are the only ones still holding the hinge.

Step 17 - Remove the two remaining hinge screws
- Now, you can lift the display up and away and to the side. Watch the wireless antenna wires and the one temperature probe when sliding the display out. They go with the display, so make sure they don’t get caught on anything.
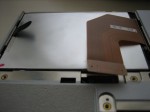
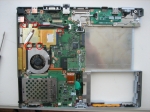
- OK, almost there! Remove both the entire wrist area and the heat shield (the sheet metal portion) away. Tada! You now have access to the vital parts of your Tablet PC’s motherboard.
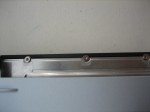
- Now, you’ll need to remove 5 screws to remove the heatsink and the fan. Then it’s easy to lift the entire assembly away.

Step 20 - Remove five screws from the heatsink
- You now have access to the processor. What you do from here is up to what you plan to do once you have disassembled your Tablet PC. If you’re planning to upgrade from a Merom processor to a Penryn processor (a Merom to another Merom or a Penryn to another Penryn) take a flathead screw driver and rotate turn the dial from the lock symbol to the unlock symbol and carefully pull the CPU out of the socket. Reverse the steps but with a new processor. If you’re planning to reapply the thermal grease, there are many guides on the Internet which will show you which thermal grease to buy (if you haven’t already) and how to apply it on the processor and the chipset (which also has thermal grease). Or, if you’re just curious to see what’s under the hood, well, that’s fine too. 🙂

Step 21 - It's imperative that you turn the dial from the locked to unlocked symbol if you plan to remove the processor

Step 1 & 2 - Remove modular bay device and main battery


Reverse the steps when reassembling, do a test run by going into the BIOS (press Enter when you see FUJITSU, use the arrow keys to go to BIOS Setup) and make sure everything runs fine and that the processor and installed RAM are recognized.
I hope you enjoy this guide on how to diassemble your Fujitsu LifeBook T4200 Series Tablet PC, this is my first diassembly guide, so I certainly hope this will be a great resource for those who have this Tablet PC.
Thanks
Thanks to kureshii for allowing me to use his one picture from his keyboard removal guide, to the members of the TPCR community, and to the distant traveler who somehow manages to find this guide, let alone this blog.
Gallery
-

- Step 1 & 2 – Remove Modular Bay Device and Main Battery
-

- Step 3 – Remove memory module(s) if needed
-

- Step 4 – Remove screws from hard drive compartment door
-

- Step 5 – Remove HDD data ribbon cable.
-
- Step 5 – The HDD ribbon cable removed
-

- Step 6 – Pull on the HDD tab on the side and slide out HDD
-

- Step 7 – Remove three screws near the hinge.
-
- Step 8 – Remove two screws behind the hinge
-

- Step 9.1 – The tricky keyboard lock/plate
-

- Step 9.2 – Slide out the back plate
-

- Stop 10 – Remove 15 screws as outlined
-
- Step 10.1 – Three screws in modular bay
-

- Step 10.2 – Remove the screw in battery compartment
-

- Step 11 – Remove screw, pull rotation indicator board up, remove right wire from circuit board, remove left wire from motherboard.
-

- Step 12 – Remove the two display cables
-

- Step 13 – Remove touchpad data ribbon cable
-

- Step 15 – Peel back tape, remove wireless antenna wires, optional step of removing wireless card
-
- Step 16 – Remove the fan cable from the motherboard
-

- Step 17 – Remove the two remaining hinge screws
-
- Step 20 – Remove five screws from the heatsink
-

- Step 21 – It’s imperative that you turn the dial from the locked to unlocked symbol if you plan to remove the processor

Pingback: How to replace fan in Fujitsu LifeBook T4200 Tablet PC >> Inside my laptop
Hi there,
Nice disassembly guide! I’ve added your tutorial to my laptop repair instructions site.
Somebody Please post clearer pictures of the motrherboard as I am having problem with my mainboard circuit close to left top part of the setp 20 image.
Thanking in advance.
This guide is outstanding! Thanks so much for taking the time to do this. We have several of these tablets at our company, and some are going out of warrantee soon. We have found the fan going out to be an inevitable fact of life. The tablets have been great other than that. It’s great to know how we can change them out ourselves.
Hello!! Nice job!!!
I need your help otherwise because I can’t get over the step 8 & 9 😦 while trying to disassemble my Lifebook T4010D… because there is a small difference.
8. Unable to “Remove three screws (with arrow icon) near the hinge” (there are only 2 screws on the T4010.
9. While trying to remove the “keyboard plate”, the middle of the plate is not free (maybe a middle screw that I can’t even access?).
Maybe you could give me some help.
Thanks.
Francis.
I BROKE MINE YOU MUST REMOVE THE SILVER STICKER TO GET THE SCREW TOO LATE FOR ME
Hi: Thank you for this great guide, I was trying to open my laptop, I will send some picture later, in my model there are some variations, ex, in the plate that holds the keyboard there is a metal plate just ahead the support of the screen, half circle shape that you need to remove and will show a screw that you need to remove before the plate is removed.
I’m opening it sionce I do have a problem that my laptop doesn’t want to do a restore, everything looks OK, memory, ps, no errors, BIOS ok, had replaced the drive but it did fails to restore, I did format the disk etc. all ok.
I will really apreciate any suggestions about it, I also did try to install other windows but when doing so the system comes with the error that not drive is installed, however remember it does all the steps and get to the point to it says remove the restore disk and press Y to start windows, when this happens I get the windows logo and stops forever.
Thank you
Alfredo
Itg is great please visit us at http://www.motormarket.tk Thanks
Excellent guide and I managed to change my fan successfully. Thank You.
But once I restarted the unit after reassembly it turns on but nothing is displayed on the screen and there seem to be a lock icon with a up and down arrow in the small lcd display on the bottom of the main monitor constantly flashing.
Did I miss something? or forget a process?
Everything was working fine previous the disassembly with the exception of the busted fan.
I took my T4210 apart to check out an issue with my fan. When I first reassembled the laptop, my fan ramped up to full speed and had the scroll lock icon flashing issue. Turned out I hadn’t fully inserted my memory chip.
I did a second disassembly and reassembly and now my laptop will not turn on at all. The battery (full) indicator on the status indicator display flashes as does the indicator icon for external power. I’m not sure what the issue is here. I’ve tried just external power, just battery power, or both at the same time and have the same issue. I’m not sure what the issue is. The laptop’s manual says that a flashing battery indicator can mean an overcharge and to disconnect external power. I’m doubt that this is the actual issue. Any ideas, anyone?
Hey guys,
I had the same problem with the laptop not making it to POST, and the scrlk
( scroll lock) icon flashing. It turns out I had swapped the ram modules. So I took out the ram and just switched them. Now everything works.
good luck
Thank you so much for the great instructions. I just disassembled my T4215 to clean the fan and heatsink. What great instructions. I never would have been able to do it without.
Thanks for taking the time to publish this.
katie
I didn’t do any dissasembling to my tablet at all, but i’m getting the same problem.
Once I restarted the unit it turns on but nothing is displayed on the screen and there seem to be a lock icon with a up and down arrow in the small lcd display on the bottom of the main monitor constantly flashing.
If you could help me, that would be great.
Pingback: For Sale : Fujitsu T4215 Tablet PC - �375 - AVForums.com
Thanks for the great page. It made opening my T4215 almost effortless.
I’ll add three things here:
1) I have the same problem after reassembly that two others have reported – the blinking numlock indicator, and no main display. HELP!
2) There are two more screws to remove the heat shield (step #19): one is near the VGA connector, and the other is near the lid latch.
3) A technique I tend to use on jobs like this is to get a bunch of little tupperware bowls to hold the screws/parts from each step. Include a little piece of paper with the parts in the bowl so that during reassembly, you can easily identify which step the parts go with.
I have used your site several times. It has great detail. Thanks you. The first time was to clean out the ice tea I split into the keyboard. Everything went great and the computer worked perfect.
I had a problem with the computer where the screen went blank. I could use the computer with an external monitor. I opened the compter then as well. I determined that it was the fl inverter. Since it ment opening the screen I took it to a repair shop. When I got it back the touch screen wasn’t working any longer. They said it was the digitizer. They ordered the part and replaced it. They said that it wasn’t the digitizer after all and must be the mother board.
I feel I must have done something wrong when putting the computer back together. Any suggestions on what it might be?
Awesome!
full step by step with pictures!
This is a real “How-To” process!
i just took my tablet apart to find out why is not turning on at all.
Great job!
I know this is kind of late, but for anyone owning a t4010 or of the same model series, the instructions here are pretty much the same except for one HUGE difference. To remove the “keyboard lock/plate” you will need to remove a hidden screw that keeps it in place. It’s located under a shiny silver crescent sticker that’s directly in front/below the screen swivel. It’s located dead center of the sticker, both front to back and left to right. If you don’t want to peel the sticker off… my advice would to take a pin and poke a hole in the sticker. Then take a small screw driver and spin it until you’ve worn the sticker away enough to expose the screw. Don’t learn the hard way like I did and break the plate in 2 pieces wondering why the hell it wont just pop up like in this tutorial. This was a great tutorial, and I love my lifebook… but damn… I HATE when screws are hidden like that!
hey, you saved me a lot of time yesterday! THANK YOU so much for providing this nice tutorial! I easily managed to open my 4210 (and re-assemble it too 😉 and build in a new CPU and a new WLAN Card (Intel 4965AGN). btw: if anyone wonders about the 3 antenna cables, the white one is for the bluetooth module, the other 2 for wlan. took me a while to figure that out as there was no bt-module installed. @White Liar: thanks for the tip, I have a t4010 here waiting to get opened 🙂
Great guide! Thanks for the time it took to put this together. We have a few of these in our fleet and they have always been the bastard step-children machines of our company. Now to work on getting Fujitsu hardware certified! 😀
These were great instrustions, disassembly went perfect, replacing the fan a breeze, assembly smooth until it came to the Keyboard Data Ribbon, when removing the keyboard it popped out and I did not get to see how it attached, If someone has this instruction or photo it would be most appreciated. My Lifebook T4220 turns on fine, just need to get Keyboard plugged in.
Thanks a million for the tutorial.
I am so grateful for this. I was a laughing stock at my job for having such a nosey fan in my T4220! I’ve had it or about 3 years now and it’s never failed me. Ever! I am such a *cough* FAN of this computer. Thank you for these instructions. I was terrified in so many steps of the way you have no idea, haha. I disassembled my computer once just for practice until my fan arrived but did not take out the mouse data ribbon. Now I see my faults! I put the ribbon in then pull the tab up thinking it locks that way… right now I can’t use the pad though. Good thing it’s a tablet pc amirite?! So I’m going to see if pushing the little green pad down again helps me.
I feel for the person who commented about his keyboard data ribbon! That was the most time consuming part in my opinion. Please keep up the great work!
YES! I hadn’t known to press the little tab down to make my touch pad work again but it did the trick! I was so scared it’d never work again… Seriously, this has been fool proof except for the paranoia of accidentally shocking or breaking one of those tiny gadgets in there.
Thank you for this guide! I had a screen replacement I wanted to perform and this helped immensely!
Touchpad removal from old keyboard to new:
This guide is great and helped immensely. In addition I need to replace the keyboard and transfer the touchpad to the bottom of the new keyboard.
Does anyone have info on this procedure? I removed the screws and noted two “rubberized” locking plungers but I’m not sure how to remove the circuit board from the keyboard assembly.
Any ideas?
Thanks,
Dennis
Hi, if I just want to get access to the fan so I can clean/oil it is there a “partial disassembly” option? Hoping that one of the panels on the bottom of the laptop can be removed to reveal the fan.
Hi Mike,
That’s not possible with the T4200 series or the series before that, you’ll have to nearly fully disassemble the system to access it. It’s only after the T5010 series that Fujitsu simplified the procedure to remove the entire bottom paneling to access the CPU, fan, RAM, etc.
SimsHsia or Anyone,
I’ve a T5010 with a noisy fan. Do you know of a guide for disassembly for his machine. Is it similar enough to the one above to use it? Any tips?
Thanks.
Dennis
Thanks a lot. You saved my … computer life! My fan made serious noises since about 1 year. In the Philippines where I lived at that time, nobody wanted to repair it, and Fujitsu had to send it in, i.e 1.5 to 3 months without computer! So I managed to buy a reserve fan, found your website, and knew I was save. Now the fan broke – and here you are with your excellent detailed instructions. THANKS!
Just 2 things: You missed some screws at the heat shield (T4220) and, much more important, pls. describe better how to remove and replace those keyboard and touchpad cables: For a dummy like me this was a heartbreaking, sweating and daring adventure because I thought I destroyed the cable …
Once more thanks and bye
Stephan
Does anyone know if there is a way to replace the latch that enables the T4010 lock itself between the tablet and notebook modes? I accidentally dropped my computer and broke my latch. I am wondering if anyone sells that part and if I can replace it easily.
Thanks man! Worked like a charm. Is there any paypal donation-link to buy you a cofee/beer?
This is great job, thanks so much man.
This is awesome work! Appreciate your effort and thank you a lot!
It worked really neat for me in order to change my cooler of the T4210.
Thanks!
Very good manual.
Thank you very much
I have chance the fan from my T4220, without any Problem.
Her is a Supplement:
Translated by google
To remove the keyboard plate above the keyboard Step 9.1, lift the cover slightly from behind and pull it back.
So the right and left latch released from the holder.
One can easily solve the keyboard plate without damage.
It must be remove only the screws on the bottom side of the notebook.
Mikel
from Germany
HI
I changed my fan yesterday, since that my tablet does not start again. I have no Idea what went wrong.
What do you suggest to be the most presumable mistake I did? Any Idea how to fix it?
I am realy thankfull for any help.
Hi
I fixed it! I just forgot one cable.
Thanks the great guide!
Geetings from Germany
Can a Bluetooth module be added?
Where did you purchase the replacement fan?
Is there a simpler way just to replace the fan and not CPU etc without opening up the back and large number of screws?
First of all thanks for hosting it here …last time i was following the original thread and did open up mine (T4215 ) and cleaned the fan .
But still it gets a lot lot hotter near the CPU area even with a less load on it.i was wondering if its normal for T42xx series to get this hotter (its really hotter not a sudden issue its been like this since i got it …bought it from ebay )
so if i change the fan or / and the cpu (now T5500 @1.66 to something better …again which is better ?? )
please help .
@ Zahid
Sorry , no !! you have to open up to replace the fan.And just to open up the back u need to remove the screws under the key board too 🙂 but its a great design and well built pc .. packs back so fine 🙂 (provided you do your part well)
Hello,
Two questions:
– I have a T4220 with the Intel 965 Express Chipset, currently with a T7700 (Merom) @ 2.4Ghz CPU. At the top of this article, you mention being able to replace the Merom processor with a Penryn processor. Can you please advise how I can determine which specific model of processor I can upgrade to? From the list at http://en.wikipedia.org/wiki/List_of_Intel_Core_2_microprocessors#.22Penryn.22.2C_.22Penryn-3M.22_.28standard-voltage.2C_45_nm.29 it seems my options are T8100, T8300, T9300, and T9500, but I’m not sure. Advice would be appreciated.
– Similarly, I need to replace the fan as it’s making quite the racket and seems to have trouble running at high speed. How can I determine the proper fan model number in an effort to order a replacement part?
Thanks,
Derek
Thanks for the very detail instruction. I followed it and could have disassembly my Fujitsu 4220. However, I now have problem putting it back togather. I do not know how/where to put the item # CP335151-z4 (in your step 11). Can you please give instruction with picture on how to put it back, please.
So, I followed all these instructions to replace the fan, and at first it seemed like all went great, until I found that the touchpad no longer works. I have opened it up several times trying to adjust how the touchpad ribbon is connected but no luck, I can’t get anything from it. Can someone please tell me how they got it reconnected? I am doing this for a friend and I really don’t want to give them their computer with a broken touchpad. Thanks for any help!
Reblogged this on anthonyvenable110 and commented:
I thought this would be helpful as I have two lifebook 4215’s that are not working.
Hey guys, I’ve got a different problem (my fan still works, T4220). The switch on the left side of the laptop that you can turn the wireless nic on and off with is broken..like nothing is behind it?
If you turn the laptop vertical it will slide under its own weight. I have a spare 4215 (mashed screen when my daughter’s inept clumsy ox of a boyfriend sat on the damned thing) so I have a parts machine to pull a switch from, and I doubt Fujitsu bothered to change anything on it. However, from looking at the pics here, I can’t find the switch, so it’s probably buried under something else. Anyone have a pic of what you have to remove (and in what order?).
My daughter’s going off to college in a week and I REALLY need to get this thing working. I have an old but working PCMCIA wireless card that was recognized by vista, but it’s a battery hog (compared to the internal card) and as you guys know these batteries don’t have much of a lifespan, nor do the cdrom drive bay batteries. So for her, having that wireless card hanging out of the side of her laptop is just asking for it to get snagged on something. I do NOT want to have to give her my nice new HP 2740p tablet! I know her, and I also know that elitebooks and beer don’t play nice.
Thanks for the great writeup. I build gaming pc’s but avoid laptops if I can at all help it (I usually buy Panasonic toughbooks (CF29/CF30 series military models) for the kids, but they’re way out of line pricewise anymore.
Dave Beem
Retired US Army Airborne Pathfinder/Sniper
Retired USAF Crewchief/jet wrench and computer geek
Retired due to an Iraqi teenager faster on his cell phone than I was on the trigger..he dialed 1800-KIL-DAVE. I pulled the trigger and got him in midair by some miraculous magic..but I think he got the better part of the deal. I retired in 2007, wife died from lung and brain cancer Nov 2009 at 40 years old. Not real good when you have 5 kids and the old man can’t work anymore! Thank god the last of the girls is off to college and out of my hair this year!
I should have followed this guide instead of opting to give my laptop to etechies(eTechies.in). They took my tablet assuring to repair the overheating and fan problem but they returned it damaged and also charged me RS 500 for ruining my laptop. The company is a fraud beware if any of you from India are planning for their services.
can you tell me please where is located bios battery for this laptop !!!
my laptop wont boot up .. when I power it ON .. the screen just stays black 😦 i think that has to do with bios or Im not sure :S please helppppppppppppp!!!
security function. use keys on monitor to unlock. incorrect inputs will fk it up. have fun 🙂
Is the cmos battery that round green thing in step 20 near the battery comp. ?
Always a pleasure to come back and use this great guide when repairing and/or upgrading a T4200 Series Tablet.
Best guide ever! Thank you so much that you took the time to do this!! My laptop is like brand new again!
The only problem is that the keyboard ribbon connector has no way to reconnect the ribbon. WTF!!!
I was able to successfully replace the keyboard recently. All you have to do is slide in the ribbon into the slot. Its a bit gentle operation, but pretty easy.
Excellent! I was struggling to get the instructions to dismantle my T4220 to reset the BIOS password as I have forgotten it. Will try it over the weekend. Weird that these guys put the BIOS battery so deep inside, and made it so difficult to dismantle.
Is it possible to remove and replace just the fan without removing the heat sinks?
Thanks!
Great guide by the way!
Okay so I sucessfully replaced my son’s dead fan in his T4220 but there is this blue cord and we can only find the place it goes to one end, the other slot is unknown and it’s connected to some part that might be important because when we turn the lifebook on, it doesn’t recieve any packets of wifi and the internal sounds device doesn’t work. I think I reconnected the audio/pcmcia ribbon the correct way though. Help please!
awesome thanks so much for these instructions. I have one still running after all these years but could use a good cleaning
very well done I still use my fuj 4215 on a regular basis and I really need to clean the fan
I changed my fan yesterday, since that my tablet does not start again. I have no Idea what went wrong.
What do you suggest to be the most presumable mistake I did? Any Idea how to fix it?
I am realy thankfull for any help.